Monday, March 27, 2017

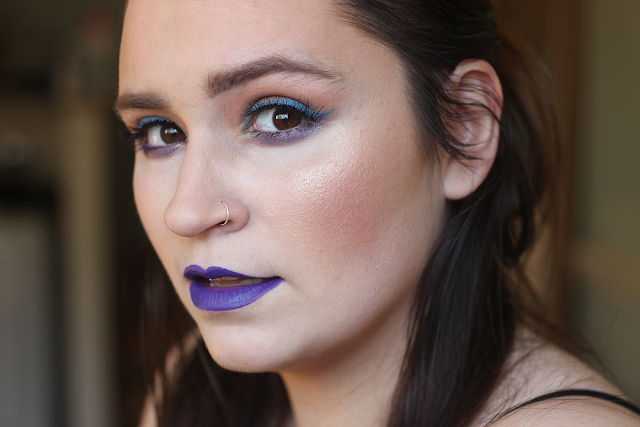
#FOTD: Mermaid Vibes With Ombre Lips


Happy Monday, loves! It's raining, my oldest is testing me today and honestly, I'm exhausted and it's not even four yet. I know many of you have already seen this look on Instagram but I figured I'd post the full pictures and information here on the blog as well. 

Can I ask...do you guys like these makeup looks? Should I go bolder? Or more wearable? Should I talk about more mommy stuff? I feel like right now I'm at a crossroad where I'm not sure which way to go. I'm trying to figure out how to work both beauty and mommy stuff in together. Let me know what you guys think.

  • Face: Urban Decay One & Done Skin Perfector mixed with Rouge Bunny Rouge Seas of Tranquility Highlighting Liquid to give a "glow within" look. Vita Liberata Trystal Bronzing Minerals Powder for a little sunkissed look and then Benefit Coralista blush. For highlight, I used Urban Decay Afterglow Highlighter in Sin (my absolute favorite!).
  • Eyes: I decided to go with a light wash for these shades. I didn't want to go too opaque with a fun, ombre lip. On the lid, I used Makeup Geek Cosmetics Whimsical padded on the lid, Curfew on the inner and outer lid and Time Travel on the bottom. House of Lashes Wispy minis for lashes (love that the outer lashes stuck together - hahaha!). Anastasia Beverly Hills Brow Definer for brows.
  • Lips: ColourPop Fern all over and then Climax in the corner, blended for an ombre look!

Shop This Look:


Wednesday, March 22, 2017

The Beauty Crop Girl Gang Liquid Lipstick Set | Swatches + Review


* Product sent for review.

Let's all give a round of applause because we are halfway to the weekend! Wooohooo! Today, we're talking about The Beauty Crop #GRLPWR Liquid Lipsticks (in the limited edition Girl Gang Set) on the blog and I'm pretty excited about it. I mean, how can that packaging not bring a smile to your face?

The Beauty Crop LE Girl Gang Liquid Lipstick Set ($56) comes with five full-sized liquid lipsticks in The Beauty Crop's best-selling shades. Each lipstick is enriched with Shea Butter and Vitamin E to keep your lips feeling soft and comfortable. They are vegan and cruelty-free! The five shades included in this set are:
  • Greige Expectations - a cool-toned grey beige.
  • Che Guava - a dusty pink.
  • Peach Please - a vibrant peach pink.
  • Date Night - a brown raisin.
  • Imma Bawse - a vampy deep wine red.

Wearing Greige Expectations
Wearing Che Guava
Wearing Peach Please
Wearing Date Night
Wearing Imma Bawse

Not all liquid lipsticks are created equal - many being drying, flakey and cracking. I'm so happy to report that the consistency of these are fabulous and are unlike most I have. All of the lipsticks I tried are very liquid-y so I kind of assumed right off the bat, they'd be super drying. Surprisingly, they were very lightweight and comfortable, never settling into my lip cracks throughout the day. I never experienced any cracking or flaking. Dry time was about one minute, so you do have to move quickly but I also noticed that I could re-apply with no issues.

The lasting power on these surpass almost all of my liquid lipsticks but  removing them can be a little tough (Micellar Water is key!). I take those as positive traits. The biggest "negative" note I have is that Greige Expectations wasn't even close to beige on me (as you can see in the photo above) and was one of the prettiest ballet pink-y nudes I've ever applied to my lips. My other favorite is Date Night because I'm a total sucker for browns.

What's your favorite shade? Have you tried any products from The Beauty Crop?
Shop | Buy ($56) 

* Product sent for review.
Saturday, March 18, 2017

Food | Healthy Dinners with Luvo Frozen Meals - Review


*Vouchers for Luvo Meals sent for review.

I have a confession to make: I don't have my stuff together. Ever. I mean, I'm late to everything, I wear the same outfits two (ahem, even three) days in a row and sometimes homecooked dinners just...don't happen.


That's why I love having a few Luvo Frozen Meals (a love child from Starbucks and Whole Foods) in my freezer for those days that dinner is on the backburner. I mean, my toddler doesn't mind frozen nuggets by any means, but I love that Luvo Frozen Meals are there and better for us to eat - with full servings of veggies, whole grains and quality meats, frozen-flashed in custom Steam-In-Pouch packaging. I never, ever have to worry about there being too much sugar or salt in the meals either as they use herbs, spices and yummy ingredients to season them (never any artificial flavors, colors or sweeteners)!

I also appreciate the fact that they use antibiotic-free meat and poultry, as well as non-GMO ingredients whenever possible and also give back to the community with local nonprofit organizations.

While they have a bunch of entrees to choose from (and even have breakfast too!), my absolute favorites are the steam-in-pouch meals:
  • Red Wine Braised Beef & Polenta
  • Turkey Meatloaf & Mashed Potatoes
  • Tandoori-Inspired Spiced Chicken (!!!!!!!)
Surprisingly, my normally picky toddler is pretty into these as well which is always a win in my book! His favorite being the Tandoori-Inspired Spiced Chicken (my fave as well!).

To make, all you have to do is:


  • Take the pouch out of the box and place it onto a microwave-safe plate.
  • Next, pop it into the microwave for about 5-6 minutes.
  • Let it sit for about a minute before removing because it'll be ~super steamy~!
  • Cut open the edge and slide it into a bowl or plate.
So yummy!

I'm horrible with breakfast for myself so I really want to go back and grab some of their breakfasts as well (I couldn't find them this time!). 

What is your go-to for dinner when you don't want to (or in my case, can't) cook?

*Vouchers for Luvo Meals sent for review.
Monday, March 13, 2017

How To | Quick + Easy Babylights Hair Tutorial w/ Schwarzkopf Color Ultime


This shop has been compensated by Collective Bias, Inc. and its advertiser. All opinions are mine alone. #APassionForHair #CollectiveBias


Last night, I was getting ready for a friend's birthday party. As I looked into the mirror, with a baby on my hip and another at my feet trying to bronze himself, I realized a few things:
  • A. That bronzer is way too dark for Hunter.
  • B. My hair needs a little help - and fast! 
After I color matched my son to a bronzer shade that better suited him (I kid, I kid!), I decided this beauty bloggin' mama was treating herself to a new hair makeover. I wanted something trendy but still low maintenance because, well, I'm a mom but I also like to keep it fresh (wait - people still say that, right?). To Pinterest I went, looking for ideas and settled on something low maintenance, trendy and - dare I say? - something I could achieve without leaving the luxury of my own home. I decided on babylights!

What are babylights? They are those delicate, natural-looking highlight that mimics the natural highlights of a child's hair. Kid's always have the best natural highlights, am I right? Lucky ducks. In the below tutorial, I'll show you how to get easy-peasy babylights and spruce up your hair - just in time for spring!

How To: Easy Babylights Hair Tutorial


  • To get started, head on over to your local Walmart and pick up a Schwarzkopf Color Ultime hair color in about two shades lighter than your current color in the hair care aisle. I picked up the gorgeous shade 4.6 Macadamia Brown which is a light brunette shade. Schwarzkopf has beautiful, vibrant choices to choose from with "true to box" results - all to use in the ease of your own home!
  • Next, make sure your hair is unwashed and doesn't have any product in it. If you try to dye your hair with product in it, it can leave the results streaky and no one wants that!
  • If you've never used this hair dye, go ahead and try a test patch first. This ensures that a.) you'll like the results and b.) that you're not allergic.
  • Next, cover your clothes either with an old sweatshirt or a cape so you don't get any dye on your normal clothes. Trust me, it doesn't come out easily!
  • Next, take the color cream, add it into the developer bottle and shake until it's evenly mixed together. Then put on gloves (yes, you should definitely put these on!) because we're about to get hands on!
  • Take the top half of your hair and clip it away from the bottom. Split the bottom half into two sections, one on each side.

  • Here's where the babylight part comes in: take small, tiny sections of hair and start to apply the product at the bottom and work your way up. I squirted a quarter sized amount of product onto my thumb and pointer finger and slid the product up and down the section, leaving about four inches of root untouched. 

  • To seamlessly blend the product into that area, I take any leftover product and, rubbing upwards (almost against the hair), I blend the little amount of product in.
  • The beauty of this, is that you can't really mess it up. Keep going around the bottom half of your head, taking very small hair sections and repeating the above steps, scattering highlights all around.
  • Once you get to the top half, you're going to repeat the same steps. Make sure to create a few extra highlights around your face but again, there's no rhyme or reason on how many highlights you do. Just make to keep them in tiny sections, about four inches away from the root and make sure to use the most product at the bottom of your sections and then lightly blend upward with the least amount of product to blend in the top part.
  • Once you're satisfied with the amount of babylights, wait about 30 minutes and then wash out.
  • Make sure to use the Intensive Care Elixir once you wash the color out. Not only does it smell amazing but it contains pearl essence mixed with rich omega oil to leave your hair so, unbelievably soft. I wish I could this as my condition every single day!
  • Wash out and style as normal!


Would you try this trend at home? How often do you dye your hair?

This shop has been compensated by Collective Bias, Inc. and its advertiser. All opinions are mine alone. #APassionForHair #CollectiveBias
Friday, March 10, 2017

#FOTD | Orange You Glad | With NüYU Sili Sponge


*This post is sponsored by NüYU Sili Sponge but all opinions are my own.


Happy Friday! I'm really excited for today's post because I'm trying out the new NüYU Sili Sponge for the first time. Have you guys seen this thing? It's been everywhere! It's supposed to be even better than your typical makeup sponge as:
  • it's made of silicone and nonporous
  • cleans easily with soap and water 
  • uses less product as it doesn't absorb any in so it uses less product = saves you money!
  • doesn't harbor bacteria
The NüYU Sili Sponge, in particular, is slightly different in that it's in the shape of a tear drop to apply in those hard to reach areas. That's a tall order to fill, don't you think? I'll be the first to admit that I have a love obsession with a certain makeup sponge so I'm anxious to see how this matches up. Let's check it out!

First Test: Liquid Foundation


(Let's not talk about how badly this foundation oxidized on me. Sheesh! Looks even worse in pictures.) Anyway, let's talk about how this little baby applies. I dabbed my foundation onto the NüYU Sili Sponge first and then applied it to my face. At first, I wasn't sure how this was going to work. Wouldn't it just smudge it everywhere? Lo and behold, after getting the hang of it, it started blending it in super smooth. I thought it'd gather and collect the foundation into small patches, but it didn't! I'm not sure why but I found the more I blended with this, the more seamless it became but can totally admit that in the beginning, it didn't look like it was going to blend well at all. Liquid foundation test: Pass!

Second Test: Cream Contour

Onto the next step: cream contour. They usually have a slightly thicker consistency than your normal liquid foundation. Again, color my surprised as the NüYU Sili Sponge buffed in my cream contour with ease! I will note that I did notice towards the end of my blending, where the contour started to "dry" it was slightly more difficult where as a wet makeup sponge might've not had an issue but still. Not too shabby at all! Cream Contour Test: Pass!

Final Test: Setting Powder

A nicely applied setting powder is obviously the icing on the cake and can really make or break on the lasting power behind a makeup look. How can the NüYU Sili Sponge hold onto powder, nonetheless apply it? I'm pretty sure this sponge is out to prove me wrong because not only did it hold onto the powder when I dipped it into the container but it applied it smoothly onto all the areas I needed it to be on.


What do you guys think? Could the NüYU Sili Sponge replace your makeup sponge?

Shop | Buy

*This post is sponsored by NüYU Sili Sponge but all opinions are my own.

Monday, March 06, 2017

#FOTD: Blue and Purple


Happy Monday, babes! So. What do you guys think of bright blue on the eyes? Are you into it Lately, I've seen a lot of beauty bloggers rock the trend and not channel Mimi from Drew Carey. So I decided to give it a whirl with my own spin on it.

Jesse's Girl sent me this beautiful teal liquid liner that I have been dying to play with so I incorporated it into this look too. Also, ColourPop's Ultra Matte Lipstick in So Wavy is one of my favorite lipsticks EVER. In the end, this look came out pretty bright and fun at the same time but I'm into it. What do you think?
 

Face:

  • BeBella Facial Essence (affiliate link - my holy grail moisturizer!)
  • BeBella Facial Essence Stick (affiliate link - just underneath the eyes for extra moisture!)
  • Pur Cosmetics Cameo Contour Dual-Ended Contour Stick in Light
  • It Cosmetics Bye Bye Under Eye Concealer in Fair
  • Benefit Cosmetics Hoola Bronzer
  • Benefit Cosmetics Coralista Blush
  • Urban Decay Cosmetics Afterglow Highlighter in Sin

Eyes:

  • Jesse's Girl Eye Lid Primer
  • Violet Voss Drenched Metals Palette (Secret in the crease, I'm So Fancy on the outer v and inner lid, Squad Goals in the middle of the lid, Dark Desires on the bottom lid)
  • Jesse's Girl Liquid Eyeliner in Blue Hawaii
  • tarte Cosmetics Lights, Camera, Lashes Mascara
  • House of Lashes Wispies Minis
  • Anastasia Beverly Hills Brow Definer in Medium Brown

Lips:

  • ColourPop So Wavy

Shop This Look:

* Affiliate links.

Wednesday, March 01, 2017

BeBe + Bella | The World's First Complete Dual Process Probiotic Skincare System


*This post is sponsored by the PRIMP Network but all opinions are my own.

I've said this a few times before on the blog but I wholeheartedly believe that the key to amazing makeup is fabulous, healthy skin underneath. Take care of your skin and it'll take care of you. I've often wondered though, how many people are trying to fix their skin, only to have the underlying issue be something you need to fix from the inside?

BeBe & Bella is a women-owned business founded in 2013 that believes you can do just that and "what you put in your body matters as much as what you put on it". They are the first company to use both probiotic supplements and skincare products in tandem with each other to create a unique skincare regime that helps correct your skincare issues from the inside out.

So what is a probiotic, you ask? Probiotics are the "good" bacteria that help balance the digestive system. According to recent research, a diet of junk food (hey, we've all been there!) or even stress can cause an unbalance in the gut and has been linked to causing eczema or acne. Pretty interesting stuff, right?

BeBe & Bella's probiotics are unique in that they have patented anti-aging ingredients: a probiotic plus Yeast Propagate Technology. According to their site, the yeast complex encourages a faster cell turnover which in turn promotes better skin.


Morning Routine:

  • Facial Cleanser ($65) - I love starting the morning off with a fresh face! The BeBella probiotic Facial Cleaner is soft and lightweight but still gets to work with removing any dirt, left over product, etc. from the day before.
  • Purifying Facial Toner ($52) - Next, I go in with the Purifying Facial Toner. This toner basically removes anything that was leftover from the cleanser.
  • Freeze Dried Probiotic Essence ($70) - This freeze dried essence is by far the coolest thing ever! It comes in two separate bottles that you have to mix together to activate with a Calibra catalyst containing hyaluronic acid. Unfortunately, once it's activated, you have seven days to use it.
  • Facial Essence ($70) - A good moisturizer is key before makeup application but there's nothing worse than a super thick moisturizer under it. I feel like my makeup just slides around when the moisturizer is thick and just sits on top of the skin. Yuck! This facial essence is exactly that - an essence, as it is water-based and contains hyaluronic acid and fermented filtrates to increase the "skin's natural flora defenses".

  • Facial Essence Stick ($65) - Talk about big things coming in small packages! I have this little baby tucked in my bag right now for when I need a little hydration on the go. It's basically the same thing as the facial essence but with a little packed punch as it contains extra lifting lipid polymers. This is great for those moments when you haven't checked the mirror before you head out, catch your reflection in the rearview mirror of your car and realize those bags under your eyes are lookin' a little heavy. It de-puffs them pretty quickly!


Night Routine:

  • Facial Cleanser ($65) - At the end of the night, it's key to remove the day off your face! Not only can leftover makeup irritate your skin but can also cause pimples, infections, etc. - not fun! If you don't wear makeup, you should still use a cleanser to remove any dirt or irritants from throughout the day. This one is incredibly lightweight and leaves my face feeling clean.
  • Purifying Facial Toner ($52) - Just like in my morning routine, I like to use a toner to follow up and remove anything left behind from the cleanser. I also think a toner helps tighten your pores and I always feel refreshed after using it.
  • Freeze Dried Probiotic Essence ($70) - Because this essence has a seven day lifespan and there's no way, with how little I use for my entire face, I could use it all up before it expires, I added this into my nightly routine for extra moisture. Your girl can always use it! This feels so incredibly nice on my skin and I wish I could have a huge stockpile in my room to use this every single week.
  • Eye Cream ($55) - Would you guys believe I don't normally use an eye cream? Crazy, right? Things have changed because I'm all about the eye cream life now. This eye cream contains a powerful duo of Vitamin E and fermented filtrates to improve and hydrate the delicate skin under your eye. 
  • Hydrating Night Cream ($120) - I wish I could explain just how luxurious this night cream is, guys. It's holy grail status. This night cream is so incredibly decadent and really locks in the moisture. Unlike most night creams, this one doesn't leave that nasty, greasy film behind and instead soaks in and leaves your skin feeling soft and supple. I'm a huge fan of this!


Probiotics:

  • BeBella BeClara Skin Lightening Supplements ($27) - These probiotics you can take twice a day. I usually do one in the morning and one at night. What this probiotic does is brighten and perfect your skin with a combo of Vitamin C, Lactobacillus, Glutathione-reduced, NAC, ALA and collagen. I've been using these for a little over a week and while I haven't noticed a super dramatic "hey, your skin is all cleared up and perfect" result, I have noticed that pimples that at one time would park themselves on my face for weeks at a time now seem to vacate the premises within a few days. 
  • BeBella Collagen Pro Supplements ($31.95) - These probiotics you can take up to three times a day. They're packed with hydrolyzed fish collagen peptide, hyaluronic acid, probiotic Lactobacillus casei, Biotin and other skin-enhancing vitamins. Again, I'm only a little over a week in but I've noticed my nails seem slightly stronger. I also noticed that my post-partum hair loss (which has been the WORST!) has slowed down and I'm not losing as much.

Before/After:

Excuse the slight color difference but let's talk about the smoothness in the under eye area! The before picture on the left is my nakey face and the picture on the right is five minutes after the Facial Essence Stick has been applied. Yes, yes, yes! Not only does it look hydrated but it feels so hydrated and silky smooth. 

Let me know your thoughts on a probiotic/skincare product routine in the comments. Do you think taking care of your skin from the inside out would work for you?

Shop | Buy
*Use the code: PRIMP20 for 20% off your order!

*This post is sponsored by the PRIMP Network but all opinions are my own.

the latest on the 'gram.